Portland Guitar Co. | Portland Oregon | Contact Jay Dickinson-503.245.3276 | jay@portlandguitar.com
Home | Orders & Sales | Photo Gallery | Current Builds | Finished Builds
Rosettes & Marquetry |Shop Tour | Biography | News
Engineered Braces | Tilt Action Neck | Split Saddle Bridge | Split Saddle Nut
Portland Guitar Pretty Good Intonation (PGPG) System
Short Version | Introduction | Intonation Errors | Analysis | PG Approach | Comparisons | Conclusion
PGPG Intonation
The Portland Guitar Approach
When I build an acoustic guitar I employ a set of technical elements that helps to enhance the playability and intonation quality of the instrument. It has been important, and I have tried to design these innovations so that they don’t interfere with or detract from the cultural aspect of the guitar. That is, in the end the technology shouldn’t get in the way of the instrument. I think the guitar should look, sound, and play like a guitar. Guitargeist!
The set of technologies I use have been gleaned from the luthier industry, our luthier community, and from my own development efforts. The following is essentially a list of the knobs and levers I have at my disposal when making adjustments to the setup and intonation. For reference purposes, the mathematics of string compensation is well known and derived in exquisite detail in Contemporary Acoustic Guitar Design and Build by Trevor Gore and Gerard Gilet.
The Tilt Action Neck: Old Old Old! To improve the playability of the instrument we can lowered the action by changing the neck angle. This technology is at least 150 years old and is used on a variety of instruments such as banjoes; it can’t be patented, don’t ask. There have been many examples of this feature over the years. I was surprised to see it in a venerables exhibition a few years ago. I was personally inspired by the article written by Mike Doolin and Harry Fleishman in American Lutherie #86 Summer 2006. I have implemented this technique with some modifications. The angle of the neck is easily set with a hex driver and the action can be adjusted from zero height to about ¼ of an inch above the frets at the 12th fret. (Fig. 14, 15)
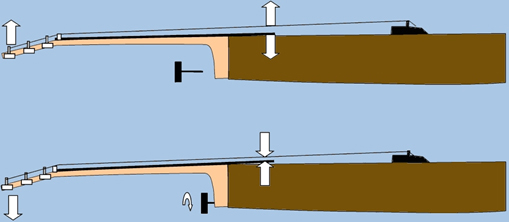
Figure 14
If the action is lowered too far though, the strings will buzz against the frets farther up the fretboard. The degree of buzzing is also affected by how hard the strings are plucked. The harder the string is plucked, the larger its amplitude and therefore a higher action is required. Because setting the action is reversible the User Adjustable Tilt Action Neck allows the player to easily experiment with the playing action and eliminates the need to change the saddle height to optimize the playability of the guitar.
The User Adjustable Tilt Action Neck also eliminates the need for a neck resetting operation. A steel string guitar is under a constant 160 to 180 pounds of tension from the strings and by necessity an acoustic guitar is built as light as possible to optimize its response. Therefore, it has been said that an acoustic guitar is an instrument that is in a perpetual state of self-destruction. One can often notice this as an increase in the action as the front of the guitar slowly collapses over time and the effective angle of the neck increases. To correct this problem usually requires taking the guitar into a technician for an expensive and dangerous process of removing the neck from the body, shaving the heel of the neck and then reattaching the neck to the body. With the User Adjustable Tilt Action Neck a simple twist of a hex (Fig. 15) key brings the guitar back to its optimal condition.

Figure 15
The Split Saddle Bridge: See Figure 16. This technology was developed in house (Patent Pending). I have developed an adjustable bridge for the acoustic guitar that tries to honor the esthetics of the instrument. Each string has an individual saddle that allows both scale length and height adjustments. When the saddle is moved the intonation errors change in a predictable way. Sliding the saddle away from the nut makes the intonation go flat, and sliding it toward the nut makes the intonation go sharp. Higher notes on the string are changed more than lower notes. In effect, the slope of the line fitting the errors changes. See figure 18. The relative height for each string is adjusted by using shims under the bridge saddle plates and allows the saddle contour to be precisely matched to the shape of the fretboard. The intonation adjustments on the saddles can be made with the strings in place and at tension and is performed using a simple push stick.
.

Figure 16
The Split Saddle Nut: See Figure 17. This technology was also developed in house (Patent Pending). Using the nut to make the scale length changes makes all of the notes on the string change by an equal amount. In effect we are adding a constant to the line that fits the errors. See Figure 18. Move the nut saddle toward the bridge and the intonation goes flat. Move it away from the bridge and the intonation goes sharp, (got that, it’s not necessarily intuitive). After a nut is designed and manufactured using the theoretical model it may be difficult to modify it if the intonation turns out to be off a bit. Removing material from the nut (intonation goes sharp) is easy, but adding material to the nut (intonation goes flat) is much more difficult. However, almost any nut compensation will improve the situation over an uncompensated nut. To address this problem I have developed a nut that has individually moveable and removable saddles. When designing this, once again I have tried to respect the esthetics of an acoustic guitar. My adjustable nut uses a set of well-hidden miniature brackets, fittings and set screws that allows the precise and repeatable placement of each saddle in the nut saddle bracket. This means that a setup can be evaluated, and then the compensation adjusted. And, we can iterate the process until a best intonation is reached rather than arbitrarily taking the guidance of a theoretical prediction.
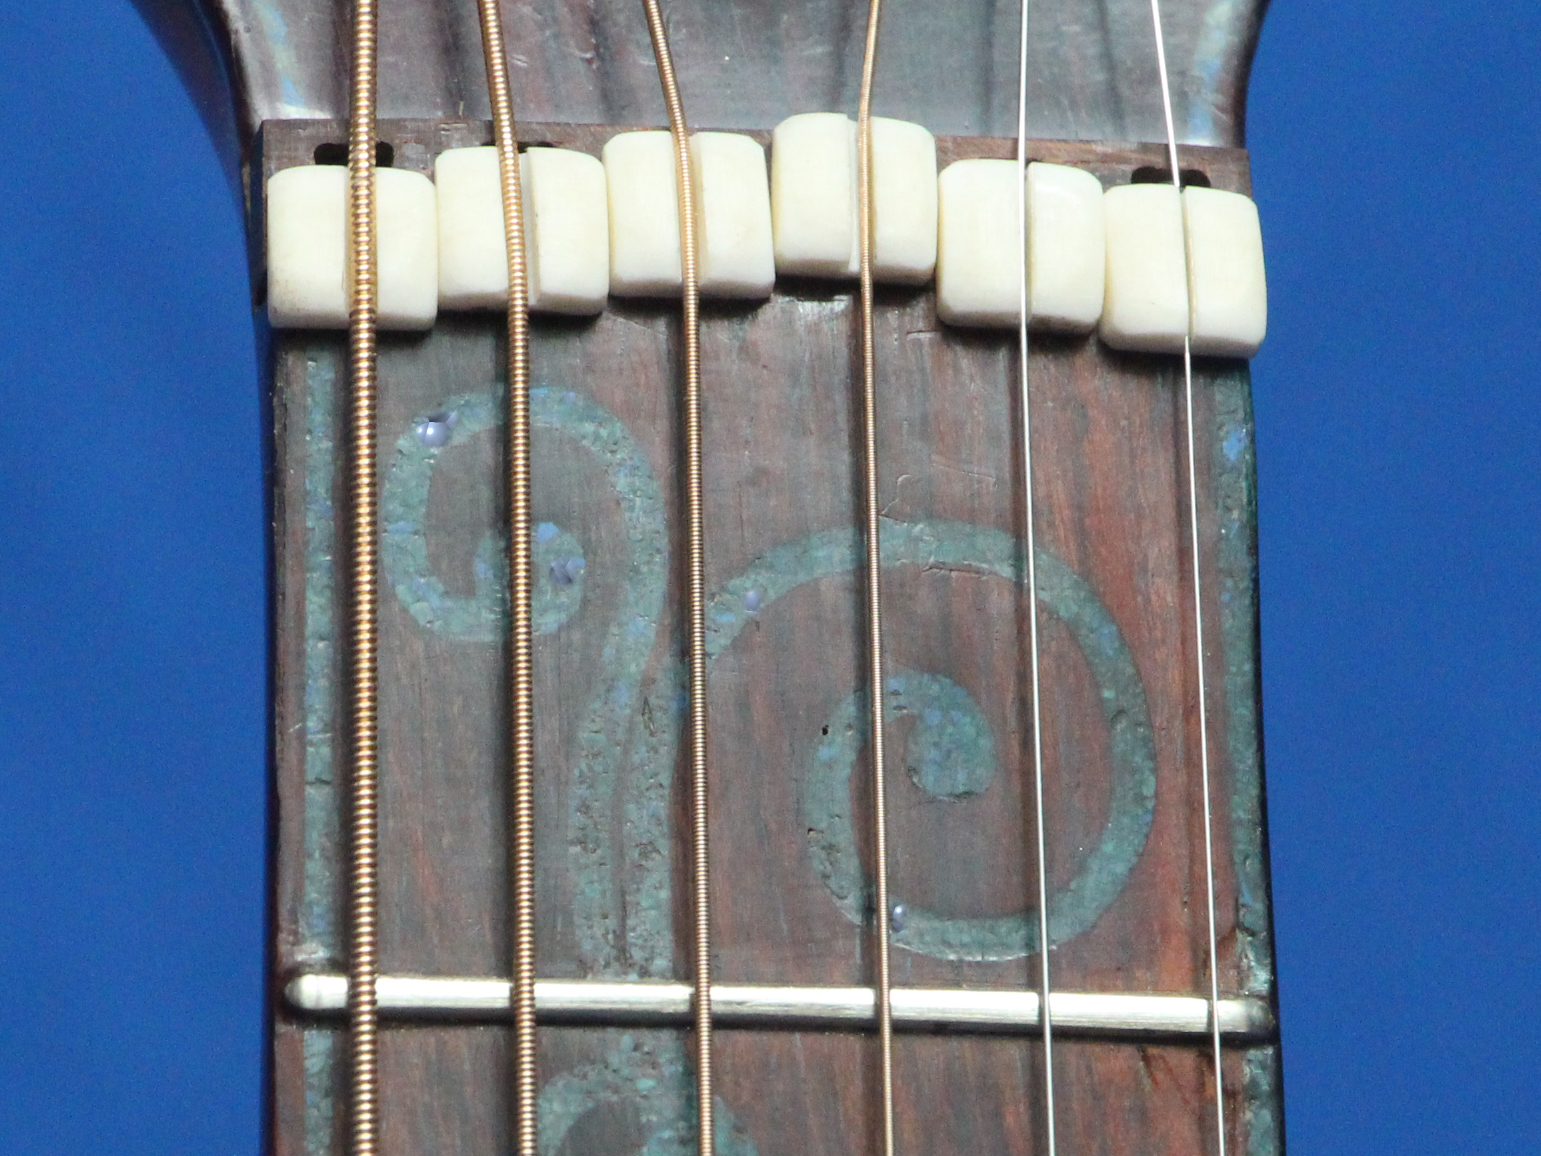
Figure 17
The Dual Action Truss Rod: This is an industry standard technology that allows for both longitudinal concave and convex forces to be applied to the neck which will change the neck’s shape. The rod is embedded in the neck and adjustments are accessed through the headstock.
The Body Modifications: There are a few things that can be done to the body of a guitar to help with intonation. In certain cases, a resonance in the guitar body might line up with a string resonance and the interaction of the two will cause the note to play out of tune, either flat or sharp depending on circumstances. This problem can be fixed by changing the frequency of the body resonance, usually by adding mass in judicious places around the guitar, and sometimes by shaving away a bit here and there. By finding these resonances, individual notes may be responsive to being corrected, or may not.
The Portland Guitar Pretty Good (PGPG) Intonation Process
Taking advantage of the technologies at my disposal I have put them all together and developed a systematic process to get the best intonation I can get out of my guitars. Surprisingly, even to my insensitive ears the guitars that this has been applied to seem to really sound better after they were set up using the PGPG Intonation Process.
Set the Action: The first step in the process is to set the desired action, as this will govern much of the intonation error. String stretch is the elephant in the room. The prospective owner must play the guitar until it feels comfortable and it has stabilized more or less. The gamut of action heights and string combinations should be tried and compared for playability and timbre. Once we have confidence that the choice of strings and action is settled upon I can then adjust the compensation. If the type of strings is changed or the action is changed in the future it will be necessary to execute the PGPG Intonation process again to get it back to optimum performance. Gladly, this is not too hard to do.
Graph the Errors: This is the tedious part of the procedure. With a little practice it takes about twenty minutes to measure and record the frequency of all of the notes that a guitar can play. Any guitar tuner that can give a digital readout of the frequency with at least 4 digits of precision should be adequate for this purpose. I have been using the Android application called TE Tuner with great success, better yet would be a spectrograph. I pluck each sting until I have successfully measured and recorded each note into a spreadsheet (138 measurements on an extended fretboard). It is important during this process that measurements are made as consistently as possible, for example, the same pressure should be applied when fretting the string, so that it isn’t bent sharp, and that the open string note is frequently checked and adjusted if necessary. Also, this is an inherently noisy measurement and so care must be taken during the testing process. You will notice that the measured frequency changes as the note goes through its attack and decay cycle, and sometimes the tuner gets confused. Which number do you write down? It will make a difference. The best advice that I can give is to be consistent in how you choose which number to record. Therefore, the more numbers you collected the better the statistics. The results are graphed using the spreadsheet with the measured data, the fitted trend line, and the upper and lower 3 cent limit lines included. The errors for each string are graphed independently (see Fig 3 -8) to aid the adjustment process and plotted as an aggregate (see Fig 2) for an overall visual quality assessment.
Adjust the Nut and Saddle: I add a trend line to the graph of the errors, a least squares fit in slope intercept form, see Figure 9, (back to high school math). If the Y intercept is above the zero line in the graph the nut needs to be moved toward the saddle. If the Y intercept is below the zero line the nut is moved away from the saddle. If the slope of the trend line is positive the saddle needs to be moved away from the nut and if the slope of the trend line is negative the saddle needs to move towards the nut. Thus we have two, more or less, independent parameters we can adjust to affect intonation… this is promising. The two are actually loosely coupled.
Repeat steps 2 and 3 as necessary until the trend line lies on the 0 line or is at least within the 3 cent detection limits.
To demonstrate the process and for clarities sake, the following set of graphs shows the results for the PGPG Intonation process applied to an “E” string.
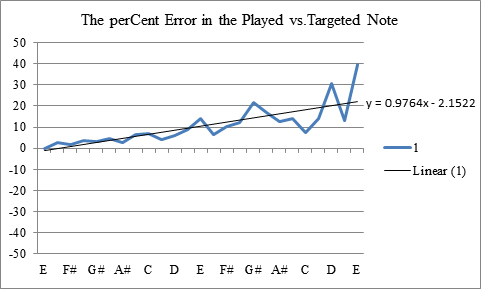
Figure 18
Step 1, Fig 18. In this first graph I have plotted the initial measurements. These are made after the action has been set and the strings are selected, but before any compensation has been applied. A linear trend line has been added to the graph to aid in the analysis. From this graph I decide to first reduce the slope of the trend line by moving the bridge saddle away from the nut by about 1/8 of an inch.

Figure 19
Step 2, Figure 19. The test measurements are taken again and graphed. We can see that the slope of the trend line has decreased, and is almost flat. We would like the trend line to have a zero slope, but for now this looks good.

Figure 20
Step 3 Figure 20. This time I have adjusted the nut so that it is closer to the bridge. This should lower the whole line evenly. The test measurements are made again and graphed. The results are almost perfect this time. The trend line is pretty flat now and the Y intercept is close to zero. This process can be continued until the trend line lies right on the zero line. Yet, there is still a degree of variability of the measured data above and below the trend line. Unfortunately this string compensation technique can’t do anything to eliminate it. These variations must have a myriad of causes, none of which have been identified and tracked down yet, but we might speculate that they lie somewhere in the realm of measurement error and resonance interactions.